The Ultimate Guide to Upgrading Your Laptop to an SSD
In today’s fast-paced digital world, having a sluggish laptop can be frustrating and counterproductive. One of the most effective ways to boost your laptop’s performance is by upgrading to a Solid State Drive (SSD). This upgrade can significantly enhance speed, reliability, and overall user experience. In this blog post, we’ll explore the benefits of upgrading to an SSD, how to choose the right SSD for your laptop, and a step-by-step guide on how to perform the upgrade.
Why Upgrade to an SSD?
1. Speed: SSDs are significantly faster than traditional Hard Disk Drives (HDDs). Boot times, file transfers, and application launches will be much quicker, improving your productivity.
2. Durability: SSDs have no moving parts, making them more resistant to physical damage compared to HDDs. This durability translates to a longer lifespan for your laptop’s storage.
3. Energy Efficiency: SSDs consume less power than HDDs, which can help extend your laptop’s battery life—a crucial factor for those who are always on the go.
4. Noise Reduction: Without the spinning disks and moving read/write heads of an HDD, SSDs operate silently, providing a quieter computing experience.
Choosing the Right SSD
When selecting an SSD for your laptop, consider the following factors:
1. Storage Capacity: Determine how much storage you need based on your usage. Common capacities range from 256GB to 1TB or more. Keep in mind your current storage usage and future needs.
2. Form Factor: Ensure the SSD is compatible with your laptop’s form factor. The most common types are 2.5-inch SATA and M.2 drives. Check your laptop’s specifications or consult the manufacturer to confirm compatibility.
3. Interface: The interface determines how the SSD connects to your laptop. SATA is the most common interface, but newer laptops may support NVMe, which offers even faster speeds.
4. Brand and Warranty: Opt for reputable brands known for reliability and customer support. Look for SSDs that come with a warranty to protect your investment.
How to Upgrade Your Laptop to an SSD
Step 1: Backup Your Data Before starting the upgrade process, backup all your important data to an external drive or cloud storage. This ensures you won’t lose any crucial files during the upgrade.
Step 2: Gather Your Tools You’ll need a few tools to perform the upgrade:
- A screwdriver (typically Phillips-head)
- Your new SSD
- A USB-to-SATA adapter or enclosure (if you plan to clone your existing drive)
Step 3: Clone Your Existing Drive (Optional) If you want to keep your existing operating system and files, use cloning software to copy your current drive to the new SSD. Connect the SSD to your laptop using a USB-to-SATA adapter and follow the software’s instructions.
Step 4: Open Your Laptop Power down your laptop and disconnect it from any power sources. Refer to your laptop’s manual or a trusted online guide for specific instructions on accessing the internal storage. Remove the screws and carefully open the laptop casing.
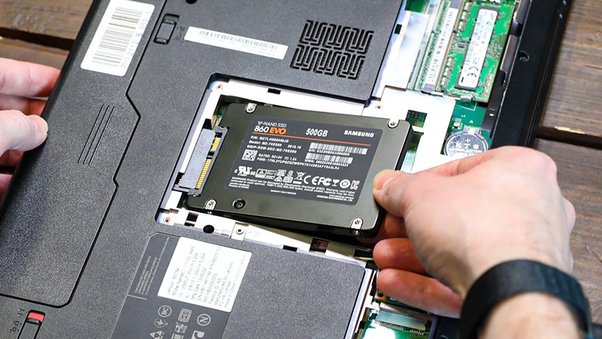
Step 5: Replace the Old Drive Locate the existing HDD or SSD and disconnect it from the laptop. Carefully remove it and replace it with the new SSD. Secure the SSD in place and reconnect any cables.
Step 6: Reassemble Your Laptop Close the laptop casing and secure it with screws. Ensure everything is properly connected and in place.
Step 7: Install the Operating System (If Needed) If you didn’t clone your old drive, you’ll need to install a fresh operating system on the new SSD. Use a bootable USB drive with the OS installation files to set up your laptop.
Step 8: Restore Your Data Transfer your backed-up data to the new SSD. Reinstall any necessary applications and customize your settings.
Conclusion
Upgrading your laptop to an SSD is one of the best investments you can make to enhance its performance, reliability, and overall user experience. With faster boot times, quicker file access, and increased durability, an SSD can breathe new life into your aging laptop. Follow this guide to choose the right SSD and perform the upgrade yourself, or contact a professional if you prefer expert assistance. Enjoy your revitalized laptop and the productivity boost that comes with it!
